Board Slotting Tutorial
August 24, 2011
Safe and successful operation of the Peachey Board Slotting Machine requires a thorough understanding of its components and capabilities. This tutorial is an expansion of a previous blog post documenting the author’s first exposure to board slotting, and attempts to provide a comprehensive description of the setup and operation of the machine. If topics are unclear or absent, please leave a comment or contact the author here. Discussion will begin with instructions for changing the blade, then move to setting the cutting angle and depth, and finish with aspects of the speed of operation. After all of the machine setup is covered, the tutorial will finish with a detailed description of the slotting process. A quick reference guide of all the steps is included at the end of the post for occasional users that need a refresher. You can also reach the quick reference by clicking here.
Part I: Machine Setup
1. Changing the Blade
The literature on board slotting discusses several different approaches to hinge and spine lining construction (Andres, 2008; Peachey, 2006; Zimmern, 2000). Different methods of board attachment can vary the thickness of the hinge material inserted into the board, requiring a matching slot. The Peachey Board Slotting Machine comes with four different blades, ranging in thickness from 0.010” to 0.050”, so that a properly sized slot may be created for the material used. A dial caliper is a useful tool for determining the blade required for a certain thickness of hinge material.
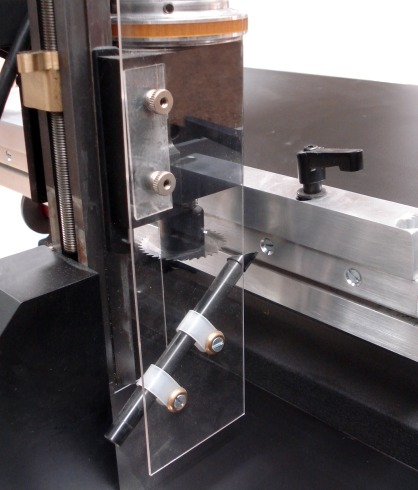
Changing the blade is a simple procedure; however, all safety protocols should be observed when attempting to do so. Ensure that the machine is powered off and unplugged before removing the clear safety guard from the right side of the saw column.
The thumb nuts holding the safety shield can be removed by hand. Grasp the drive wheel at the top of the motor to hold the blade in place while carefully loosening the bolt underneath the blade using the included hex wrench. After removing the hex bolt and saw blade holder, the blade will come free. Exchange blades for one of the desired thickness that is clean and sharp. Ensure that it is in the proper orientation for cutting (illustrated below) when mounting it on the machine.
The new blade should rest flush against the mount. Replace the saw blade holder (flat side down) and hex bolt. Hold the drive wheel to fully tighten the blade with the hex wrench before replacing the safety shield.
2. Adjusting the Carriage Angle
In order for the hinge of the slotted board to function properly, the cut must start just below the top of the board and go to its center.
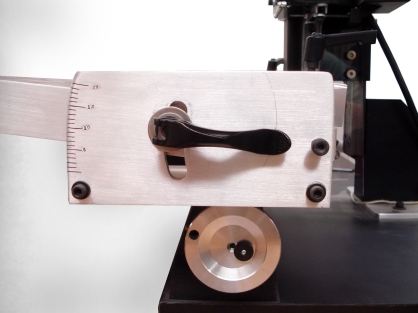
The depth of the cut may be altered by adjusting the pitch and distance of the carriage relative to the blade. The carriage pitch can range from 0-20 degrees, but the recommended slotting angle for most boards is between 10 and 15 degrees. Thinner boards require a lower angle.
The angle of the platen is adjusted by loosening the black quick-release handle at the left side of the carriage. Angle markings have been engraved into the carriage base to allow for quick and easy setup.
3. Controlling the Depth of Cut
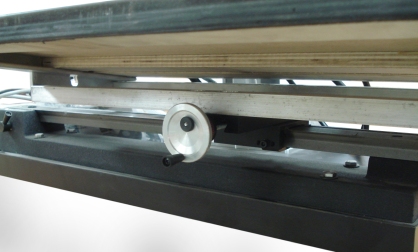
The depth of the saw cut is adjusted by moving the carriage toward the blade using a wheel located at the back of the machine, underneath the carriage.
This wheel is calibrated in 0.001” divisions and one full revolution moves the carriage 0.050”. For most boards, a cutting distance of about 3/16” will suffice. Three full revolutions of the wheel will achieve the recommended cutting depth (0.150” or ~3/16”). This measurement may need to be altered for very thick or thin boards.
4. Setting the Blade Height
The slot begins directly beneath the board covering material, and the wheel at the top of the saw column adjusts the blade height. Like the carriage adjustment, this wheel is calibrated in 0.001” increments, with one full turn raising or lowering the blade by 0.050”. The brass handle further down the column locks the blade position in place. To unlock the height adjustment, the brass handle must be moved to the left.
5. Speed of Operation
The Peachey Board Slotting Machine features independent saw and carriage speed controls. The saw is equipped with a 0.50 horsepower motor with variable speeds ranging from 70-2800 rpm. The on/off switch and speed control for the saw motor are located at the front of the saw-arm assembly, facing the operator (see above).
The saw speed knob should be set to a 3-4 o’clock position during operation. Cutting at a higher saw speed poses a danger of overheating and burning the board.
A separate controller box operates the carriage direction and variable speed. The toggle switch activates the carriage movement and control direction, while the knob alters the speed. A carriage speed of 2.5 to 3 is recommended to keep the board from overheating.
(NOTE: It is very important to visualize the movement of the carriage before setting it in motion. As the carriage is moving instead of the saw, it is very easy to become confused and send the board slotting in the wrong direction!).
Part II: Description of Operation
Now that the machine is set up and controls have been reviewed, the machine is ready for use. The book board is placed with the outside of the board face-up in the carriage and centered under the clamping bar. Ensure that the spine edge of the board is flush with the edge of the carriage. If the board covering material may be damaged by the tension bar, a scrap piece of binder board cut to the same dimensions as the book board may be placed between the tension bar and board. Tighten the bolts on the tension bar simultaneously and evenly in order to achieve uniform tension on the board, much like tightening a lying press. Uneven tension may adversely affect the saw cut, damaging the book board.
The height of the blade is set to just under the board covering material (0.040″ – 0.080″ below the top of the board). It is important to check the alignment of the blade at both ends of the board before slotting. To do this, move the carriage so that the blade is at the tail end of the book board. Bring the carriage toward the blade until the saw teeth are just against the board edge. Flip the brass lever at the front of the saw column to the left, and move the blade to the correct height.
Peachey (2006) describes three methods for aligning the blade to just under the covering material (p. 31). If the placement of the blade cannot be accomplished by eye, a scalpel may be used as a gauge. Simply press the tip of a scalpel blade into the spine surface of the board at the intended position of the slot and raise the blade until it rests against the flat of the scalpel.
One may also calculate the appropriate blade height. Using a caliper, measure the thickness of the board and set the blade height through the divisions on the adjustment wheel (marked in 0.001” intervals).
When the blade height is properly set at the tail of the board, lock the blade position by flipping the brass lever to the right. Back the carriage away from the blade, then move the carriage to the right so that the head of the board is at the blade. Once again, adjust the carriage depth so that the teeth of the blade are just against the board edge and examine the alignment. If the blade position is the same at each end of the board, the slot may be cut. Some boards may be warped or distorted so that the same blade height will not slot evenly across. If this is the case, adjust the blade height to compensate and recheck the alignment.
The slot is always cut from the head of the board to the tail, or with the carriage direction opposite that of the saw. Not only does this produce a straighter cut, but most of the board debris is expelled by the motion of the saw (Peachey, 2006, p. 30).
One will start and stop the cutting of the blade in different locations on the board, depending upon the method of board attachment. For example, Peachey (2006) describes a method of “biscuit slotting” for tight backs in which the board is only slotted at the head and tail spine panels (p. 30). Andres (2008) describes a repair structure in which the boards are slotted all the way through the turn-in material (p. 24). It is also often easier to slot through the length of the board if the initial cut was in the wrong position, the boards have extreme backcornering, or the covering material is abraded. Most instances, however, will require a slot that begins just inside the head edge of the board and continues along the length to just inside the tail edge (illustrated below).
With the carriage position set at the head of the board, start the blade motor and check the motor speed. At this time, the vacuum is started. Adjust the carriage depth until the blade begins to make contact with the board edge, then set the cutting depth by turning the wheel three full revolutions. Flip the carriage control toggle to the left and turn the carriage speed up to 2.5.
Closely monitor the progress of the slotting operation. If burning occurs, the blade or carriage speed should be reduced. If burning persists, the blade may need to be cleaned or sharpened. When the blade gets close to the tail edge of the board, slow the carriage motion until it reaches the appropriate position. Stop the carriage motion by turning the knob down to zero and flipping the toggle to the center. Back the carriage away from the blade and turn off the saw motor. Finally, switch off the vacuum and loosen the tension bar. Remove the book board from the platen and gently tap the spine edge of the board against a hard surface to clear any sawdust. A micro spatula may also be used to clear the slot.
Part III: Quick Reference Guide
- Determine the appropriate blade thickness and change the blade (if required).
- Set the carriage angle.
- Place the board in the carriage.
- Move the carriage to the tail of the book and adjust the blade height.
- Move the carriage to head of the board and check the blade height.
- Start the saw blade with the speed dial set to 3 or 4 o’clock.
- Turn on the vacuum.
- Move the carriage up to the blade, then turn the wheel three revolutions to achieve the right depth.
- Flip the carriage toggle switch to the left and begin the carriage motion (at a speed of 2.5 or 3).
- When the board has reached the desired endpoint, stop the carriage.
- Back the carriage off of the blade.
- Turn off the saw motor.
- Turn off the vaccum.
- Remove the board from the machine and gently tap the spine edge to knock out any debris.
____________
Andres, A. M. (2008). A new variation on board slotting: Case binding meets in-boards binding. The Bonefolder: an e-journal for the bookbinder and book artist, 4(2), 24-26.
Peachey, J. S. (2006). New possibilities for board slotting. The Bonefolder: an e-journal for the bookbinder and book artist, 2(2), 28-32.
Zimmern, F. (2000). Board slotting: A machine-supported book conservation method. The Book and Paper Group Annual, 19, 19-25.


August 29, 2011 at 9:39 am
Great post, Henry – a really thorough and accurate synopsis of the technique. I particularly liked the emphasis on safe operation for board and operator and the quick reference guide. It is a superb aide memoir for anyone who only uses the slotter occasionally as well as being a very reliable and compact source of information for people starting out. You’ve done a great job!
September 1, 2011 at 2:59 am
[…] virtual venues. I finished a board slotting tutorial for Jeff Peachey’s Board Slotting Blog (found here) and wrote a short piece on a treatment for the Parks Library Preservation Blog (found […]